Privacy-First & Self-Hosted

BabyGuard
Smart Baby Monitor

Build your own ultra-low latency baby monitor with Raspberry Pi, WebRTC streaming, and complete privacy control. No cloud, no subscriptions, just pure peace of mind.

< 200ms
Ultra-Low Latency
100%
Privacy Control
WebRTC
Real-Time Streaming
Open Source
MIT License

What is BabyGuard?

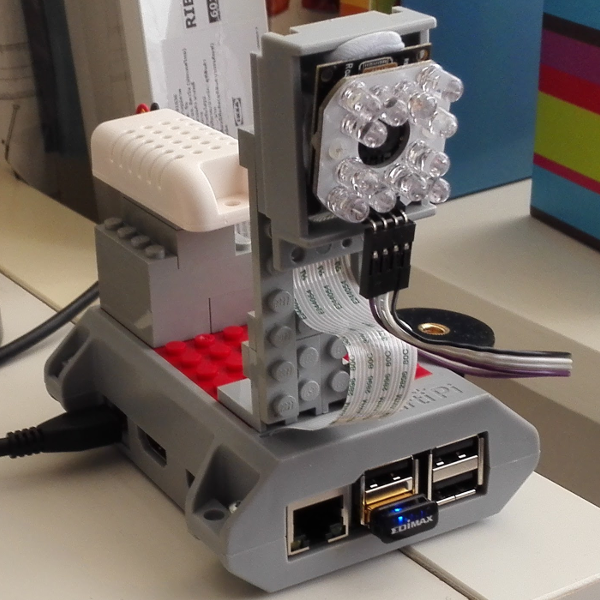
BabyGuard is a self-hosted, privacy-first baby monitoring system built for Raspberry Pi 4. Unlike commercial baby monitors that rely on cloud services and monthly subscriptions, BabyGuard gives you complete control over your data and privacy.

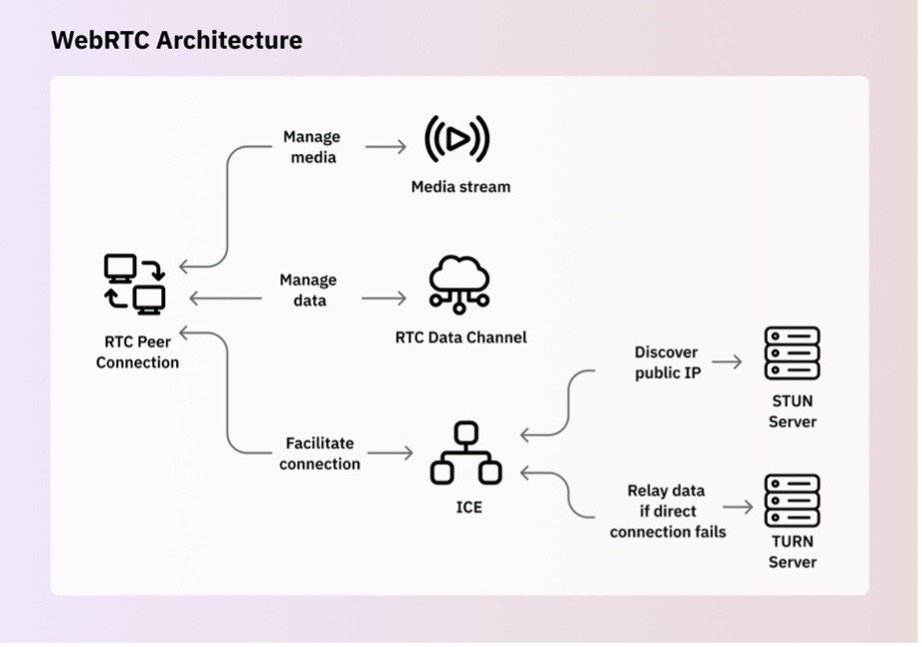
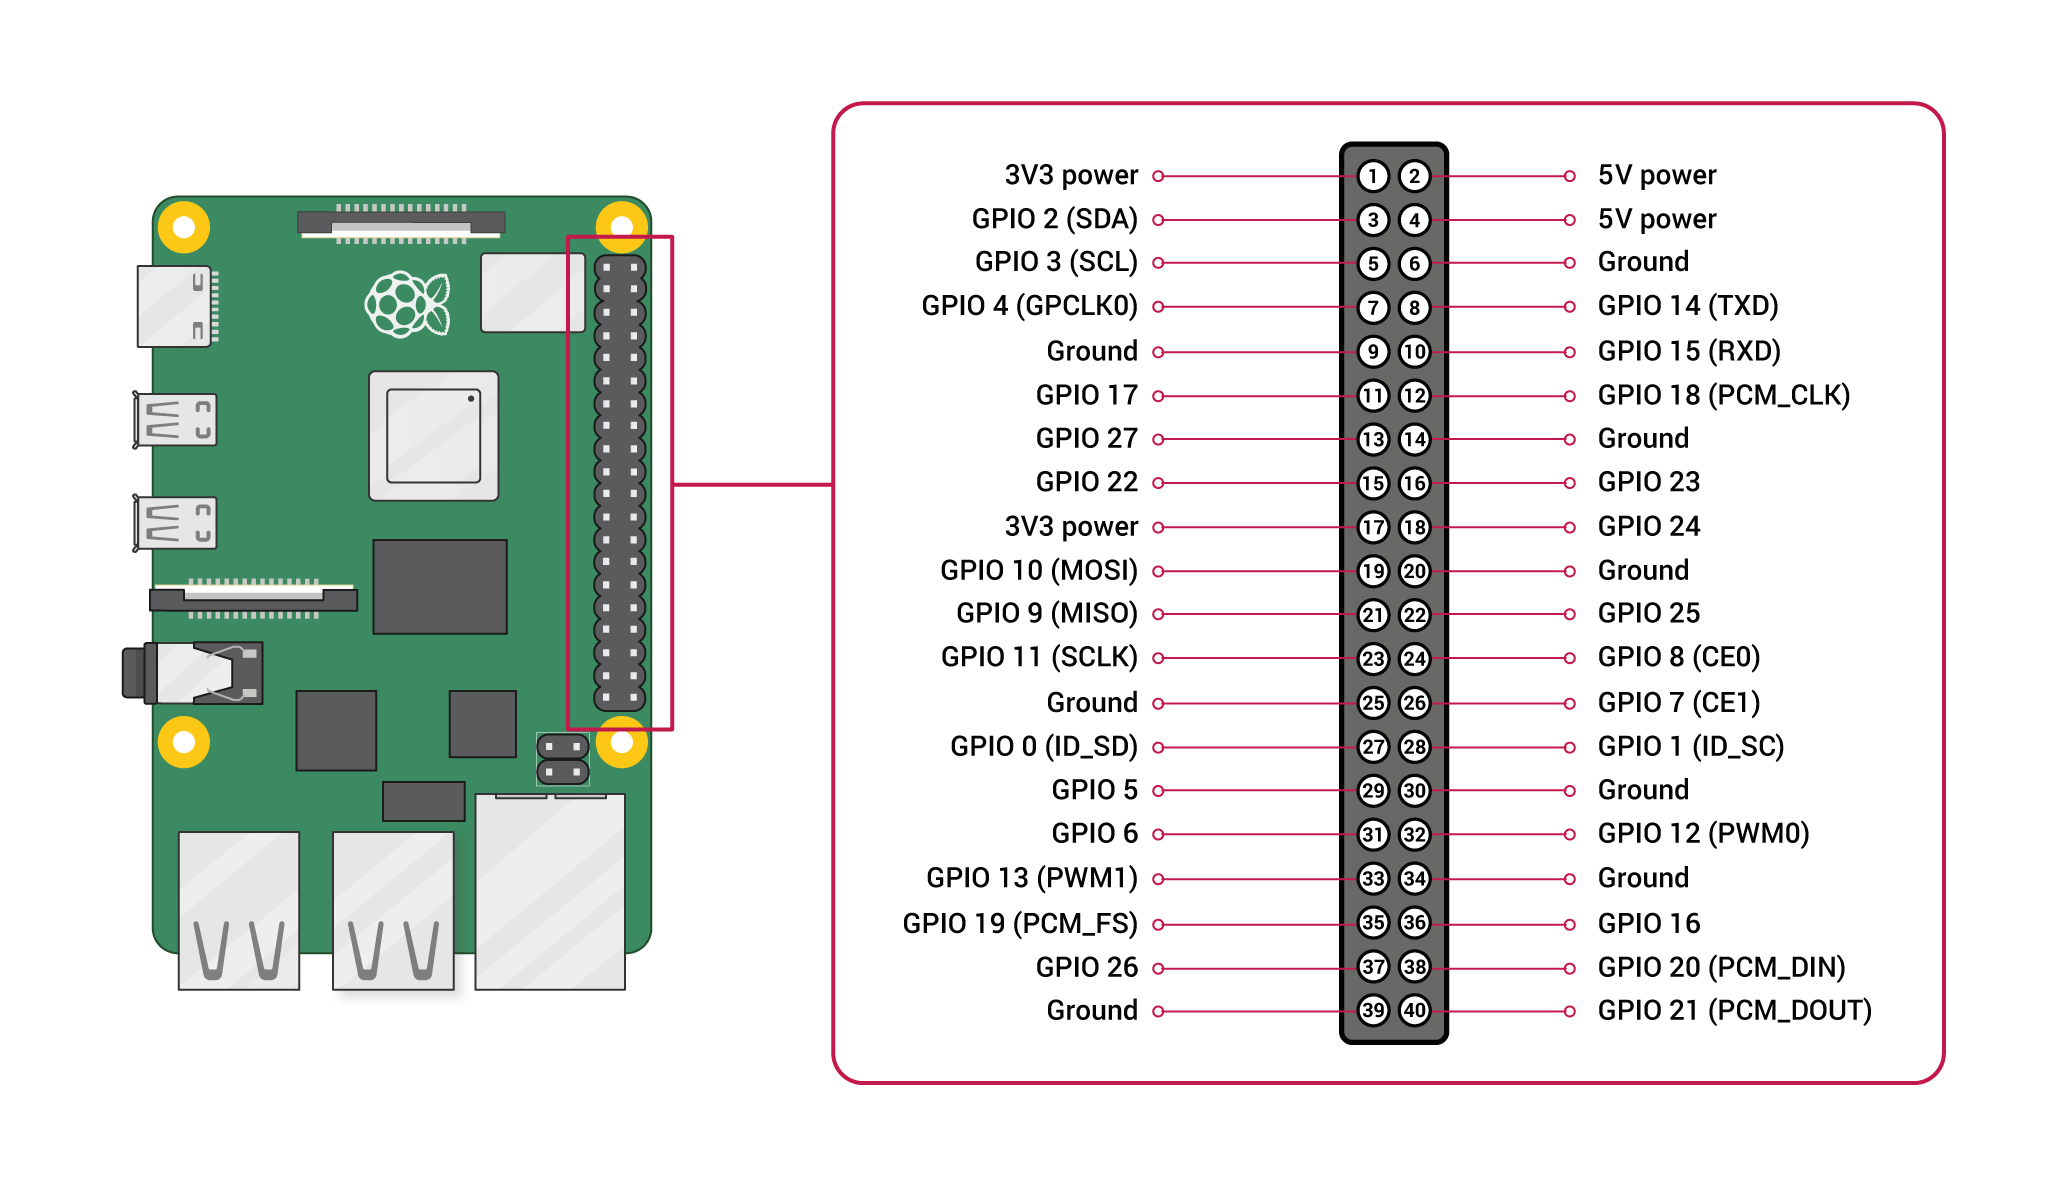
Using cutting-edge WebRTC technology, it delivers ultra-low latency (< 200ms) video and audio streaming directly to your browser—no apps required. The system integrates with various sensors (temperature, humidity, motion) and hardware components (IR blasters, LEDs, buzzers) through GPIO pins.

No Cloud Dependencies

Your data never leaves your network

No Monthly Fees

One-time hardware cost, free software forever

Full Customization

Open source code you can modify and extend

BabyGuard Hardware Setup
v1.3.8
Latest Version

Powerful Features

Everything you need to monitor your little one with confidence and control

WebRTC Streaming

Peer-to-peer video/audio streaming with < 200ms latency. No server relay needed, direct browser-to-device connection using modern WebRTC protocols.

Environmental Monitoring

Real-time temperature and humidity tracking with DHT22/DHT11 sensors. Get alerts when conditions fall outside safe ranges.

Two-Way Audio

Push-to-talk functionality lets you soothe your baby remotely. Built-in white noise and lullaby player for better sleep.

Smart GPIO Control

Control LEDs, buzzers, IR blasters, and other hardware components through Raspberry Pi's GPIO pins. Automate night lights and alerts.

Enterprise Security

JWT authentication, HTTPS encryption, cookie-based sessions, and secure WebSocket connections keep your feed private and protected.

Weather Integration

External weather API integration shows outdoor conditions alongside indoor monitoring for complete environmental awareness.

Recording & Snapshots

Capture snapshots or record video clips in AVI format. Save precious moments or review important events with timestamp metadata.

System Health Dashboard

Monitor CPU usage, memory, bandwidth, WiFi signal strength, and system temperature in real-time to ensure optimal performance.

LAN/WAN Access

Access from anywhere with WireGuard VPN and Caddy reverse proxy setup. Secure remote monitoring without exposing your device to the internet.

System Architecture

Understanding how the pieces fit together—from hardware sensors to browser streaming

Three-Tier Architecture

1. Hardware Layer (Raspberry Pi)

Camera module, microphone, DHT sensors, IR receiver/transmitter, GPIO-controlled LEDs and buzzers. All physical components interface through Pi's GPIO pins and CSI/USB ports.

2. Backend Layer (FastAPI + WebRTC)

Python-based async web server handles HTTP requests, WebSocket connections, WebRTC signaling, sensor polling, and hardware control. Uses aiortc for WebRTC implementation.

3. Frontend Layer (Browser)

Responsive web interface with HTML5/CSS3/JavaScript. WebRTC peer connection for media streaming, Socket.IO for real-time updates, and REST API for control commands.

FastAPI Architecture

Data Flow & Communication

Capture

Camera & mic capture raw audio/video data

Encode

WebRTC codecs compress & packetize streams

Transmit

P2P connection streams data via SRTP

Display

Browser decodes & renders in real-time

Technology Stack

Modern, battle-tested technologies working together seamlessly

FastAPI

Modern Python web framework for building async APIs with automatic docs and type checking.

  • Async/await support
  • Auto-generated OpenAPI docs
  • Pydantic data validation
📹

WebRTC (aiortc)

Real-time communication protocol for peer-to-peer audio/video streaming without plugins.

  • < 200ms latency
  • P2P connection (no server relay)
  • SRTP encryption
🔌

Socket.IO

Bidirectional real-time communication for sensor data, notifications, and live updates.

  • WebSocket fallback
  • Event-based architecture
  • Auto-reconnection
🔧

RPi.GPIO

Python library to control Raspberry Pi GPIO pins for sensors and actuators.

  • Digital I/O control
  • PWM support
  • I2C/SPI protocols
🎨

Jinja2

Powerful templating engine for rendering dynamic HTML pages server-side.

  • Template inheritance
  • Auto-escaping
  • Fast rendering
🔐

PyJWT

JSON Web Token implementation for secure, stateless authentication.

  • Stateless auth
  • Token expiration
  • Digital signatures
💾

SQLite + SQLAlchemy

Lightweight database with ORM for storing settings, logs, and user data.

  • Zero configuration
  • ACID compliant
  • Pythonic ORM
🌐

Caddy Server

Modern web server with automatic HTTPS for secure reverse proxy setup.

  • Auto SSL certificates
  • HTTP/2 support
  • Simple config

WebRTC Deep Dive

Understanding the magic behind ultra-low latency peer-to-peer streaming

WebRTC Architecture

How WebRTC Works in BabyGuard

1

Signaling (WebSocket)

Browser and Raspberry Pi exchange SDP (Session Description Protocol) offers/answers and ICE candidates through WebSocket connection to establish P2P parameters.

2

NAT Traversal (STUN/TURN)

STUN servers help discover public IP addresses. If direct connection fails (symmetric NAT), TURN server relays traffic (BabyGuard prefers direct P2P for lowest latency).

3

Media Streaming (SRTP)

Once connected, video/audio streams flow directly via SRTP (Secure Real-time Transport Protocol) with end-to-end encryption—no server in the middle!

4

Codec Negotiation

H.264 for video and Opus for audio provide optimal quality/latency balance. Hardware acceleration on Pi 4 ensures smooth encoding.

Why WebRTC vs Traditional Streaming?

Ultra-Low Latency

< 200ms vs 2-10 seconds for HLS/DASH. See your baby in real-time, not delayed.

🔒

End-to-End Encryption

DTLS-SRTP encrypts all media. No intermediaries can intercept your feed.

🌐

No Plugins Required

Native browser support. Works on Chrome, Firefox, Safari, Edge—no Flash or Java.

Hardware Components

Everything you need to build your BabyGuard system

Required Components

Raspberry Pi 4

2GB+ RAM recommended

The brain of BabyGuard. Pi 4's quad-core CPU handles WebRTC encoding and sensor polling simultaneously with ease.

Camera Module

CSI or USB webcam

Raspberry Pi Camera Module v2 or any UVC-compatible USB webcam. 1080p@30fps recommended for smooth streaming.

USB Microphone

Any USB mic or USB cam with mic

For two-way audio communication. Built-in mic on USB webcams works great, or use a dedicated USB microphone for better quality.

DHT22 Sensor

Temp & humidity

Digital temperature and humidity sensor connected to GPIO. More accurate than DHT11, perfect for nursery monitoring.

Breadboard & Jumper Wires

For GPIO connections

Essential for connecting sensors and components to GPIO pins without soldering. Male-to-female jumper wires recommended.

Power Supply

5V 3A USB-C

Official Raspberry Pi power supply or equivalent. Stable power is crucial for reliable operation and preventing SD card corruption.

Optional Enhancements

💡

IR LEDs

Infrared LEDs for night vision illumination (850nm or 940nm)

📡

IR Receiver (TSOP)

Learn and replay IR codes from remotes for smart control

🔔

Active Buzzer

Audio alerts for temperature thresholds or motion detection

🎨

RGB LED Strip

PWM-controlled ambient lighting with color customization

GPIO Pinout Reference

Raspberry Pi GPIO Pinout
Power (3.3V/5V)
Ground (GND)
GPIO (Programmable)
I2C (SDA/SCL)
SPI (MOSI/MISO/SCLK)
UART (TXD/RXD)

Software Installation

Get BabyGuard running in minutes with our automated setup script

Quick Install (Recommended)

# Clone the repository
git clone https://github.com/Zedstron/babymonitor
cd babymonitor

# Run automated setup
sudo chmod +x setup.sh
sudo ./setup.sh

# That's it! Access at https://your-pi-ip:8000

Installs all dependencies

Configures system settings

Starts the application

Manual Installation Steps

1

Install System Dependencies

sudo apt update
sudo apt install -y $(cat packages.txt)
# Includes: python3-pip, libjpeg-dev, zlib1g-dev, etc.
2

Set Up Python Virtual Environment

python3 -m venv venv
source venv/bin/activate
pip install --upgrade pip
pip install -r requirements.txt
3

Generate SSL Certificates (Required for HTTPS)

mkdir cert && cd cert
openssl req -x509 -newkey rsa:2048 \
  -keyout key.pem \
  -out cert.pem \
  -days 365 \
  -nodes
# Note: Browsers require HTTPS for microphone access
4

Enable Raspberry Pi Camera (if using CSI)

sudo raspi-config
# Navigate to: Interface Options > Camera > Enable
sudo reboot
5

Run the Application

python main.py
# Server starts at https://0.0.0.0:8000
# Access via: https://your-pi-ip:8000

Important: Always use HTTPS (not HTTP) to access the interface, otherwise browser security will block microphone access.

Deployment & Remote Access

Access your BabyGuard from anywhere in the world—securely

Local Network Access

Access BabyGuard from any device on your home WiFi network. Simple and secure—no internet connection required.

Find your Pi's IP address:

hostname -I

Access via browser:

https://192.168.1.100:8000

Set static IP (recommended):

Configure in router or /etc/dhcpcd.conf

Remote WAN Access

Monitor from anywhere using WireGuard VPN + Caddy reverse proxy. Enterprise-grade security without exposing your Pi to the internet.

WireGuard VPN Setup

Create secure tunnel to home network

Caddy Reverse Proxy

Auto SSL certificates & domain routing

Port Forwarding (Minimal)

Only WireGuard port (UDP 51820)

Detailed WireGuard + Caddy configuration guide available in repository docs.

Security Best Practices

Strong Passwords

Change default credentials immediately. Use 16+ character passwords with mixed case, numbers, and symbols.

Regular Updates

Keep Raspberry Pi OS and dependencies updated: sudo apt update && sudo apt upgrade

Firewall Rules

Enable UFW firewall. Only allow necessary ports (8000 for LAN, 51820 for WireGuard).

Network Segmentation

Place BabyGuard on isolated VLAN or guest network to limit lateral movement if compromised.

Backup Configurations

Regularly backup /etc, database files, and custom configurations to external storage.

Disable Unused Services

Turn off SSH, VNC, or other services when not needed to reduce attack surface.

Development Roadmap

Exciting features coming soon to make BabyGuard even more powerful

AI Cry Detection

Machine learning model to detect and classify baby cries, sending push notifications with cry type (hungry, tired, discomfort).

In Progress
Planned

Motion & Occupancy Detection

Computer vision algorithms to detect movement, track baby position, and alert if baby leaves crib or covers face.

Push Notifications

Native mobile push notifications via Firebase Cloud Messaging (FCM) or Telegram bot integration for instant alerts.

Planned
Future

Facial Emotion Analysis

Deep learning to detect baby's emotional state (happy, crying, sleeping) and provide insights on sleep patterns and mood trends.

React/Angular Frontend

Modern SPA frontend migration for better UX, offline support with PWA, and advanced features like multi-camera support and timeline scrubbing.

Future

Ready to Build Your BabyGuard?

Join the privacy-first baby monitoring revolution. No subscriptions, no cloud, just peace of mind.